Once your service/s has been migrated, you can manage your account, make a payment and configure your phone settings quickly and easily, 24/7, conveniently from any smart device in the new Vonex Customer Portal.
You will receive a notification from Team Vonex to confirm the successful migration of your service/s. Once received, please follow these instructions to access the Vonex Customer Portal for the first time.
Watch the video tutorial here: https://youtu.be/ciGdPSnoTEg
You may notice that some of your services have yet to appear in the portal. If this is the case, they will appear once migrated at a later date.
Retrieving your One-Time Password & Logging In (video tutorial above)
- Visit https://consumer.vonex.com.au/
- At the top of the webpage, click ‘Retrieve Password’ next to the Vonex logo.
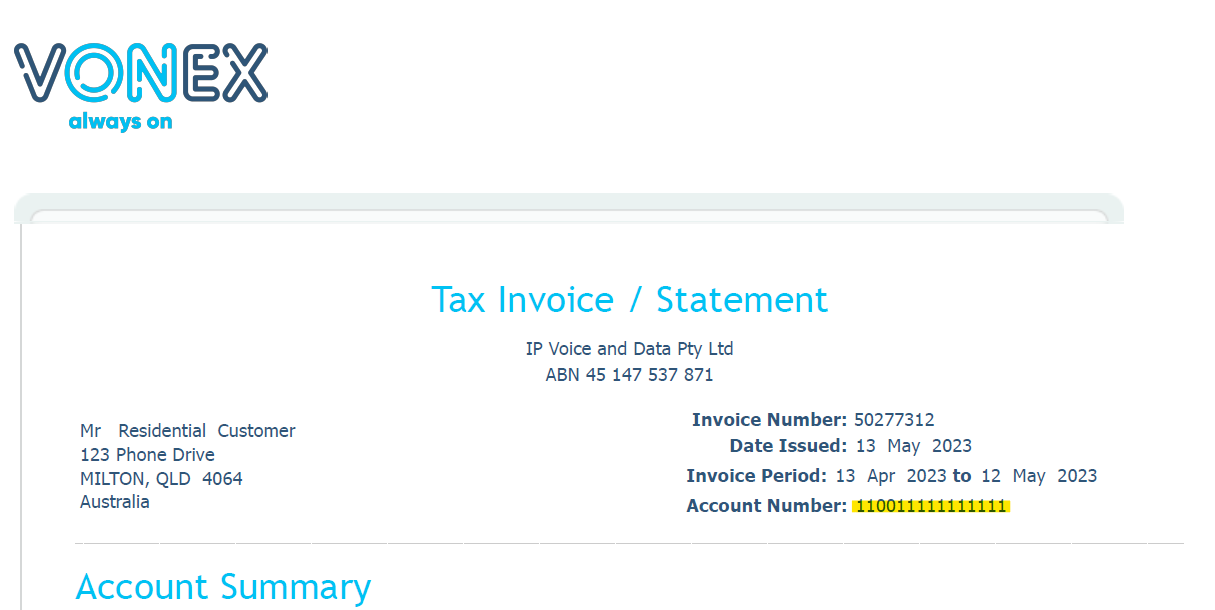
- Enter the account number, email address and phone number associated with your old account. You can find this information on past bills, highlighted in the image below.
If you do not have all of this information available, please email the Vonex Consumer Support Team at residential@vonex.com.au for assistance.
- Click the blue ‘Proceed’ button at the bottom of the form. If the details are correct, a green message will pop up on the right side of the page, and an email will be sent to you within 5 minutes. If the details were incorrect, please call the Consumer Support Team on 1300 731 048.
- Please check your inbox and click the link in the email.
- You will be redirected to ontimesecret.com. Click the ‘View Secret’ button to reveal your login details. Record them somewhere safe.
- Visit the Vonex website at https://vonex.com.au
- Navigate to the Vonex Customer Portal by clicking the ‘customer icon’ at the top of the homepage. You’ll find it in the top right corner, to the left of the light blue button to book an appointment.
- Select ‘Vonex Customer Portal’ from the dropdown list. The portal will open in a new tab.
- Now you can log in by entering the login details provided.
- Click ‘Login’
- Once logged in, navigate the dashboard intuitively by clicking the rotating image or menu tabs across the top to:
- View unbilled items
- View and download past statements
- View your payment history
- Make a credit card payment
- View your personal details, where you can change the password to something you prefer.
- Configure your phone settings (see further instructions below)
- And Logout
Configuring Your Phone Settings
- Click the ‘Phone Configuration’ tab
- You must log in again using the same credentials as before – your new Vonex Account Number and password.
- Click the ‘Login’ button.
The dashboard provides an overview of your call history (recent calls, missed calls) and lets you quickly navigate to call forward settings via the shortcut.
View Call History
- Navigate to the top menu and click ‘Applications’.
- Select ‘Call Detail Records’ from the dropdown list.
- Filter your call history by direction (inbound, outbound or local), status (answered, missed, voicemail, cancelled, failed), caller ID and more.
Configuring Call forward
- Navigate to the top menu and click ‘Applications’.
- Select ‘Call Forward’ from the dropdown list.
- Click on the number or extension you wish to configure.
- Set up call forwarding number, on busy, no answer, not registered, follow me, Ignore busy and do not disturb.
- Click the ‘Save’ button in the top right corner to activate your new settings.
Setting Up Voicemail
- Navigate to the top menu and click ‘Applications’.
- Select ‘Voicemail’ from the dropdown list.
- Configure the following settings for each extension: Voicemail password, Enable or disable the voicemail tutorial, Update your email address and Enable or disable the voicemail feature.
- Click the ‘Save’ button in the top right corner to activate your new settings.
Listen, Download or Delete Voicemail Messages
- Navigate to the top menu and click ‘Applications’.
- Select ‘Voicemail’ from the dropdown list.
- On the Voicemail menu, under Tools, click ‘Messages’ to access a list of recorded messages and details, including when the message was created, called ID information, message length and file size.
To listen to recorded messages, click the ‘play icon’ under Tools.
To download recorded messages, click the ‘download icon’ under Tools.
To delete messages, select the messages you would like to delete by clicking the checkbox to the left. Click the black ‘Delete’ button in the top right corner.
Navigating Back to the Dashboard
To return to the main dashboard at any stage, click ‘Home’ from the top menu and select ‘Dashboard’ from the dropdown list.
Logging Out
When you’re ready to log out, click ‘Home’ from the top menu and select ‘Logout’ from the dropdown list.
marketing
Comments